We're back for part two of the Combined Mentions series.
If you missed it, in Part One we setup our application and installed a basic implementation of TributeJS. Please check that out if you haven't!
Emojis (backend)
Let's start with implementing support for Emojis by creating a route + controller and json (jbuilder) view that our JavaScript will make a fetch request to. Inside of the routes.rb file
  namespace :emojis do
    resources :mentions, only: [:index]
  end
Add this block of code at the top, below the root to: call, we'll be adding our additional mention types below this emoji namespace. Next let's create our emojis/mentions_controller.rb inside of app/controllers...
class Emojis::MentionsController < ApplicationController
  def index
    @emojis = Emoji.all - Emoji.all.select(&:custom?)

    respond_to do |format|
      format.json
    end
  end
end
This controller set's an instance var named @emojis to the results from the gemoji gem we installed in the first post, but we're removing any emojis that are marked as a custom emoji so only the Unicode emojis show up. Next let's make our app/views/emojis/mentions/index.json.jbuilder file and put the following into it:
json.array! @emojis do |emoji|
  json.type "emoji"
  json.name emoji.name
  json.content emoji.raw
end
This returns an array of emoji objects where each emoji object has the following structure:
We'll use the "type" key to help differentiate between the three different kinds of mentions our app will support later. Now we should be able to visit http://localhost:3000/emojis/mentions.json and see a bunch of JSON with our emojis returned inside of it. We're ready to begin the JavaScript portion of the Emoji implementation now 🎉.
Emojis (front-end)
Let's add a third collection to the initializeTribute() function in our combined-mentions stimulus controller, you should put this next to the other two collection objects we already have.
In this case we're setting up the trigger for emojis to match GitHub and Slack and other apps that use :emoji: to point to the name of the emoji. We're calling a function we haven't defined (yet) to fetch the emojis and setting the lookup to look at the "name" key in the JSON returned from the fetch request. In the case of our emojis, we want to set allowSpaces to false since our emoji names are separated by underscores there should be no space between the two semicolons. Then lastly we want to show the TributeJS menu after the user types one character and we only want to show up to 10 emojis in the list.
The last option is menuItemTemplate which takes a function that gets used to display the select options for our users. In my case I wanted to match GitHub's experience where the emojis are shown first then the name is next to it separated by a space. Note that item.original.content will pull it from the values array that gets returned from our fetchEmojis function.
fetchEmojis Since we've already got our endpoint on the backend going, we can create a fetch request and grab the JSON directly. Add this function to your Stimulus controller
One thing I didn't touch on before is TributeJS will make a fetch request on every keystroke a user types after the Trigger, so it may be helpful for you to add a debounced feature to help slow down the amount of server requests. Right now it will make one API request for every key someone types after :
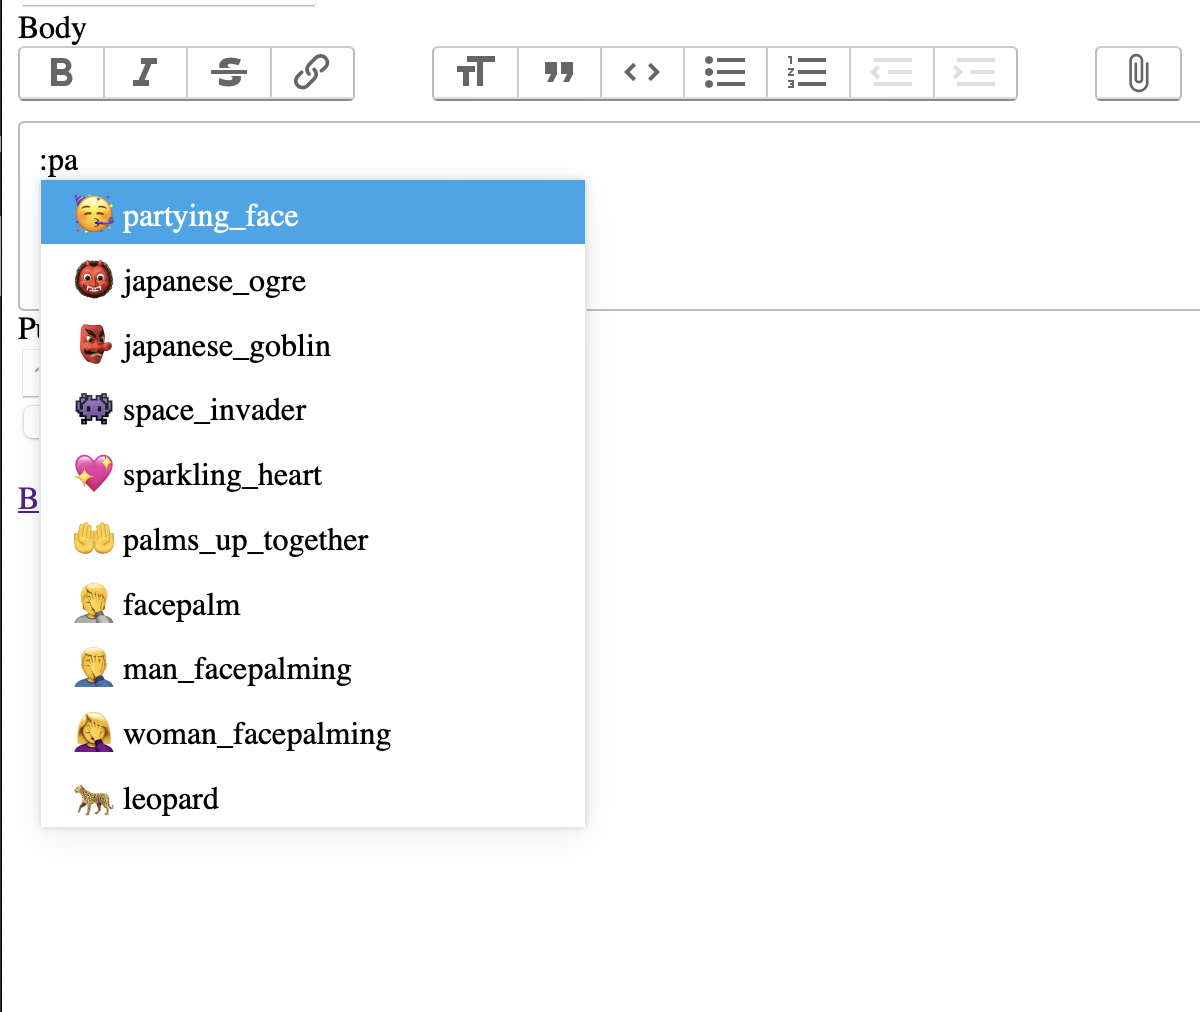
Now if we try it out on our Posts form, we'll see our emojis in our list if we type : and then proceed to type the emoji name we're searching for.
Awesome! We're halfway there, if you notice when you hit enter on an emoji it doesn't insert the emoji into the editor, it's still trying to insert our link we had stubbed in the replaced function in Part One.
Let's fix that by writing a conditional to look if the type is present and if it is, look if it is emoji to match for our emoji type.
  replaced(event) {
     let mention = event.detail.item.original

     if (mention.type && mention.type === "emoji") {
      this.editor.insertString(mention.content)
     } else {
      this.editor.insertHTML(`${mention.key}`)
     }
   }
In our case, with the emoji we can use Trix's insertString function to insert the content returned in the selected tribute menu item into our Editor.
Now if you try out emojis again you can now select emojis and have them inserted into your ActionText editor 🥳.
Great work, go celebrate by adding all of your favorite emojis to a Post if you'd like (I spent like fifteen minutes when I first implemented the functionality just playing adding emojis, I had so much fun).
Saved Replies (backend)
If you haven't already, add a few Saved Replies to the scaffolded model so you have some data. I recommend using Lorem Ipsum for the body so it's longer, and setting a title you can remember. I used "First saved" and "Second Saved" for the title of mine. Let's start off by creating our route + controller and JSON (jbuilder) view like we did for Emojis. In your routes:
  namespace :saved_replies do
    resources :mentions, only: [:index]
  end
Next we can create our app/controllers/saved_replies/mentions_controller.rb file and put the following content
class SavedReplies::MentionsController < ApplicationController
  def index
    # TODO: Add in search functionality for saved replies, param will come across as query
    @saved_replies = SavedReply.all

    respond_to do |format|
      format.json
    end
  end
end
For the sake of time, I chose to not implement something like pg_search into my testing app, but here where we call SavedReply.all I'd add in scoping for the user, and add in a search scope to filter by the title that gets passed in. This looks fairly similar to our emojis controller, so you can maybe guess what our json file will look like.
We'll create app/views/saved_replies/mentions/index.json.jbuilder and put the content as:
json.array! @saved_replies do |saved_reply|
  json.extract! saved_reply, :id, :title
  json.type "saved_reply"
  json.content saved_reply.body.to_s
end
This results in an array of objects containing the following structure
{ "id":2,"title":"Second Saved","type":"saved_reply","content": "...html content from trix..." }
This functions similar to the Emojis object, with the exception being the lookup key is the title of our saved reply, if you named it something other than title you'd update this bit. Lastly we don't need a specific menuItemTemplate so we can skip that bit and let TributeJS just show the saved reply's title.
And the last thing to setup before we try it out is the replaced function needs to know how to handle saved_reply type objects.
  replaced(event) {
     let mention = event.detail.item.original

      if (mention.type && mention.type === "emoji") {
        this.editor.insertString(mention.content)
      } else if (mention.type && mention.type === "saved_reply") {
        this.editor.insertHTML(mention.content)
      } else {
        this.editor.insertHTML(`${mention.key}`)
      }
   }
We'll use Trix's insertHTML and insert the mention.contentthat's returned in the selected mention's JSON object. In this case it's already HTML we've saved from a trix editor so we'll just insert the whole HTML snippet and call it a day.
Let's try it out! Alright! We've got Emojis and Saved Replies working now it's starting to feel pretty good and functional. The last thing I want to show is how @ mentions of a model can work with this as well. In my case I'll use Articles but in your app this could be your User mentions.
Article mentions (backend)
Article Mentions should be familiar enough that you could probably do it with your eyes closed, but to recap
Our routes.rb file now looks like:
Rails.application.routes.draw do
  root to: "posts#index"

  namespace :articles do
    resources :mentions, only: [:index]
  end

  namespace :emojis do
    resources :mentions, only: [:index]
  end

  namespace :saved_replies do
    resources :mentions, only: [:index]
  end

  resources :articles
  resources :posts
  resources :saved_replies
end
Next our app/controllers/articles/mentions_controller.rb file should look similar to our saved replies controller.
class Articles::MentionsController < ApplicationController
  def index
    # TODO: Add in search functionality for Articles, param will come across as query
    @articles = Article.all

    respond_to do |format|
      format.json
    end
  end
end
We need to update our Article model to prepare it to be Attachable for ActionText. Let's update it to include the ActionText::Attachable concern and define a attachable_plain_text_representation method.
class Article < ApplicationRecord
  include ActionText::Attachable

  has_rich_text :body

  def attachable_plain_text_representation(caption = nil)
    caption || title
  end
end
And lastly, our JSON jbuilder file will look slightly different but mostly similar in app/views/articles/mentions/index.json.jbuilder
json.array! @articles do |article|
  json.extract! article, :id, :title
  json.type "article"
  json.sgid(article.attachable_sgid)
  json.content  render(partial: "articles/article", locals: {article: article}, formats: [:html])
end
If you're wondering, the attachable_sgid method comes from including ActionText::Attachable in your model, and we're rendering the scaffolded articles/_article partial to save us some time on this blog post. If you want to customize the partials specifically for ActionText I'll leave that as an exercise for you to do on your own.
Our object the JSON returns is similar to the SavedReplies but includes one extra field "sgid" which is a signed global id Trix will use when it creates an attachment in the JavaScript side of things.
{
  "id":2
  "title":"Second article",
  "type":"article",
  "sgid":"...(a long signed id)...",
  "content":"...html content rendered from the partial..."
}
☺️ We're coming down the final stretch here, now it's time to tackle the front-end.
Article mentions (front-end)
Let's update our initializeTribute() function to replace the existing stubbed collection for the @ trigger.
        // Article mentions, but perhaps this is a user mention for your app.
        {
          trigger: "@",
          allowSpaces: true,
          lookup: "title",
          menuShowMinLength: 1,
          menuItemLength: 10,
          values: this.fetchArticles
        },
This is almost identical to the fetchSavedReplies except for the values calling the fetchArticles function so I won't rehash it here.
fetchArticles Surprising to no-one this is identical to the other calls except for the changes to the path and the naming of the response objects.
replaced function Update your replaced function to match this final replaced function from our tutorial app... The new code is in the else branch of our if else if, where we tell Trix to create a new attachment with the sgid and content from our mention object and then calls Trix's insertAttachment function to insert it to the editor.
  replaced(event) {
     let mention = event.detail.item.original

      if (mention.type && mention.type === "emoji") {
        this.editor.insertString(mention.content)
      } else if (mention.type && mention.type === "saved_reply") {
        this.editor.insertHTML(mention.content)
      } else {
        let attachment = new Trix.Attachment({
          content: mention.content,
          sgid: mention.sgid
        })

        this.editor.insertAttachment(attachment)
        this.editor.insertString(" ")
      }
   }
Finished product
Recap
We've built a fully functioning combined mentions feature that features support for emojis, saved replies, and @ mentions for Articles. That's all for this series of posts and I hope you find this helpful on your journey. 👋